Agenda
Workshop AgendaLab Four - Integrating Redux
Switch to Lab04
- In a terminal:
cd ../ # presuming still in previous lab
cd lab-04
yarn start
Check it out!
-
While we were working on the last lab, the rest of the team was adding lots of new stuff to the app
-
Before proceeding, let’s look at the progress that has been made:
- Peruse the src directory and notice that there’s a new Timeunits module. This will track time entries in a Timesheet
- It has been hooked up to Redux already. Some parts of src/timeunits/Timeunits.js may sound familiar from the lecture -
connect,mapDispatchToProps,mapStateToPropsfor example - The team has implemented actions and reducers for large parts of the app. Take a look at those directories to get a feel for how these items are laid out and used.
- Finally, look at the src/index.js, src/reducers/index.js and src/store/configure-store.js to see how we instantiated Redux and included it in our app.
- Don’t worry if it looks a little cryptic - by the end of this lab you will have a better understanding of what is happening.
-
What will we do?
- We want to replace our use of static data with loading data dynamically using Rest service calls. To do this we’ll need a way to retrieve all employees and retrieve a single employee.
- We will be building our EmployeeActionCreator and our employee-reducer.
- Next we will add our reducer to the rootReducer and connect our state and actions to our Employees component
- Then we will update our Employees components to use our actions to retrieve our list of employees.
- Finally, we will update our EmployeeRow to delete/restore employees using the actions we created.
Create the Employee Action Types
- Open src/actions/EmployeeActionTypes.js
- Let’s add the constants for the list and get actions.
export const LIST = 'LIST_EMPLOYEES';
export const GET = 'GET_EMPLOYEE';
Create the Employee Actions
-
Redux Thunk typically works this way:
- A trigger (usually user activity, but could be an expiring timer, etc) will execute an asynchronous method
- The method will execute whatever logic is necessary to complete the activity flow (getting data, updating data, etc). Typically this involves making Rest service calls.
- Any results of the activity that the application state must respond to (changing values in Redux State) are communicated by dispatching an action. A single asynchronous method may generate 0 to many actions.
- A common pattern is for an action will be dispatched when a service call is starting so a loading indicator can be activated and when the service call completes (either successfully or unsuccessfully) so the indicator can be stopped
- In our examples here we’re only dispatching actions at the end of each activity to inform the application when new data has been retrieved - to retain simplicity we aren’t using loading indicators so we dispense with those actions
-
Now open src/actions/EmployeeActionCreator.js so we can create the actions.
-
We’ll import the types we just created, and the Axios library to handle our http requests.
import * as EmployeeActionTypes from './EmployeeActionTypes';
import Axios from 'axios';- Now let’s implement the functions that will be used to update the state of our application.
export const list = employees => {
  return {
    type: EmployeeActionTypes.LIST,
    employees: employees,
  };
};

export const get = employee => {
  return {
    type: EmployeeActionTypes.GET,
    employee: employee,
  };
};- Next we’ll implement the asynchronous methods that will be used to make our http Requests, along with a helper method to build the url.
const apiUrl = '/api/users';

const url = employeeId => {
  if (employeeId) {
    return `${apiUrl}/${employeeId}`;
  }
  return apiUrl;
};

export const listEmployees = () => {
  return dispatch => {
    return Axios.get(url())
      .then(response => {
        dispatch(list(response.data));
        console.log('Employees retrieved.');
      })
      .catch(error => {
        console.log('Error attempting to retrieve employees.', error);
      });
  };
};

export const getEmployee = id => {
  return dispatch => {
    return Axios.get(url(id))
      .then(res => {
        dispatch(get(res.data));
        return true;
      })
      .catch(error => {
        console.log('There was an error getting the employee');
      });
  };
};

export const updateEmployee = employee => {
  return dispatch => {
    return Axios.put(url(employee._id), employee)
      .then(res => {
        dispatch(get(res.data));
        console.log(`Employee : ${employee._id}, updated.`);
        return true;
      })
      .catch(error => {
        console.log('There was an error updating employee.');
      });
  };
};

export const removeEmployee = employee => {
  return dispatch => {
    employee.deleted = true;

    return Axios.put(url(employee._id), employee)
      .then(res => {
        dispatch(get(res.data));
        console.log(`Employee : ${res.data._id}, was deleted.`);
        return true;
      })
      .catch(error => {
        console.log('Error attempting to delete employee.');
      });
  };
};

export const restoreEmployee = employee => {
  return dispatch => {
    employee.deleted = false;

    return Axios.put(url(employee._id), employee)
      .then(res => {
        dispatch(get(res.data));
        console.log(`Employee : ${res.data._id}, was restored.`);
        return true;
      })
      .catch(error => {
        console.log('Error attempting to restore employee.');
      });
  };
};

export const createEmployee = employee => {
  return dispatch => {
    return Axios.post(url(), employee)
      .then(res => {
        dispatch(get(res.data));
        console.log(`Employee : ${res.data._id}, created.`);
        return true;
      })
      .catch(error => {
        console.log('There was an error creating employee.');
      });
  };
};- Finally let’s test that our functions do what we think they should:
- Open src/actions/EmployeeActionCreator.test.js and replace the stubbed out test with the following:
import configureMockStore from 'redux-mock-store';
import thunk from 'redux-thunk';
import * as actions from './EmployeeActionCreator';
import * as types from './EmployeeActionTypes';
import moxios from 'moxios';

const middlewares = [thunk];
const mockStore = configureMockStore(middlewares);

describe('synchronous actions', () => {
  it('list should send objects', () => {
    expect(actions.list(['p1', 'p2'])).toEqual({
      type: types.LIST,
      employees: ['p1', 'p2'],
    });
  });

  it('get should send object', () => {
    expect(actions.get('p1')).toEqual({
      type: types.GET,
      employee: 'p1',
    });
  });
});

describe('async actions', () => {
  beforeEach(() => {
    moxios.install();
  });

  afterEach(() => {
    moxios.uninstall();
  });

  it('creates LIST when fetching employees has been done', () => {
    moxios.stubRequest('/api/users', {
      status: 200,
      response: ['employee1', 'employee2'],
    });

    const expectedActions = [
      { type: types.LIST, employees: ['employee1', 'employee2'] },
    ];
    const store = mockStore({ employees: [] });

    return store.dispatch(actions.listEmployees()).then(() => {
      // return of async actions
      expect(store.getActions()).toEqual(expectedActions);
    });
  });

  it('create GET when requesting single employee', () => {
    moxios.stubRequest('/api/users/1', {
      status: 200,
      response: 'employee1',
    });

    const expectedActions = [{ type: types.GET, employee: 'employee1' }];
    const store = mockStore({ employees: [] });

    return store.dispatch(actions.getEmployee(1)).then(() => {
      // return of async actions
      expect(store.getActions()).toEqual(expectedActions);
    });
  });

  it('create GET when updating a employee', () => {
    moxios.stubRequest('/api/users/1', {
      status: 200,
      response: 'employee1',
    });

    const expectedActions = [{ type: types.GET, employee: 'employee1' }];
    const store = mockStore({ employees: [] });

    return store.dispatch(actions.updateEmployee({ _id: 1 })).then(() => {
      // return of async actions
      expect(store.getActions()).toEqual(expectedActions);
    });
  });

  it('create GET when removing a employee', () => {
    moxios.stubRequest('/api/users/1', {
      status: 200,
      response: 'employee1',
    });

    const expectedActions = [{ type: types.GET, employee: 'employee1' }];
    const store = mockStore({ employees: [] });

    return store.dispatch(actions.removeEmployee({ _id: 1 })).then(() => {
      // return of async actions
      expect(store.getActions()).toEqual(expectedActions);
    });
  });

  it('create GET when restoring a employee', () => {
    moxios.stubRequest('/api/users/1', {
      status: 200,
      response: 'employee1',
    });

    const expectedActions = [{ type: types.GET, employee: 'employee1' }];
    const store = mockStore({ employees: [] });

    return store.dispatch(actions.restoreEmployee({ _id: 1 })).then(() => {
      // return of async actions
      expect(store.getActions()).toEqual(expectedActions);
    });
  });
});-
Let’s take a look at what we are doing here. - First we’re testing that the synchronous actions are creating packets of type LIST and GET. - Then in the asynchronous tests we are using moxios to http response for our axois requests, and we’re using the redux-mock-store’s configureMockStore to mock our redux store so we can dispatch or actions and test them. - Finally, we are using those mocks to see that the async actions generate the packets we expect when dispatched.
-
Make sure the tests pass and move on to the next section.
Create the Reducer
- Open src/reducers/employee-reducer.js
- Import the action types we created earlier and implement the reducing function.
import * as EmployeeActionTypes from '../actions/EmployeeActionTypes';

export default (state = { data: [] }, action) => {
  switch (action.type) {
    case EmployeeActionTypes.LIST:
      return { ...state, data: action.employees };
    case EmployeeActionTypes.GET:
      const updatedItem = action.employee;
      const index = state.data.findIndex(d => d._id === updatedItem._id);
        if (index >= 0 ) {
          const copy = [...state.data];
          copy.splice(index, 1, updatedItem);
          return { ...state, data: copy };
        }
        return { ...state, data: [...state.data, updatedItem] };
    default:
      return state;
  }
};-
When the reducer receives a LIST action it will replace the currently-stored list of employees with the new one from the action’s payload
-
When a GET is received the reducer will attempt to replace the existing version of that employee in state, or will add to the end of the list if it’s a new item
-
Now let’s add our employee-reducer to the combined reducer
-
Open src/reducers/index.js
-
Import the employee-reducer
import employees from './employee-reducer';- Add it to the list of reducers so it looks like this:
const rootReducer = combineReducers({
  projects: projects,
  timesheets: timesheets,
  timeunits: timeunits,
  employees: employees,
});
Use the Employee Actions
- Now, let’s update our Employee components to use these actions.
- Open src/employees/Employees.js
- Import some redux libraries we need and the EmployeeActionCreator
import { connect } from 'react-redux';
import * as EmployeeActionCreators from '../actions/EmployeeActionCreator';- Next lets add the mapStateToProps and mapDispatchToProps methods between the component and the export.
const mapStateToProps = state => {
  return {
    employees: state.employees.data,
  };
};

const mapDispatchToProps = {
  listEmployees: EmployeeActionCreators.listEmployees,
  deleteEmployee: EmployeeActionCreators.removeEmployee,
  restoreEmployee: EmployeeActionCreators.restoreEmployee
};- Then we’ll modify the export to connect the methods to the component using the redux connect() method we imported above
export default connect(mapStateToProps, mapDispatchToProps)(Employees);- Next, we can replace previously hard-coded state data with a call to the listEmployees action in a lifecycle method to retrieve the employees from the server. Replace the state initialization with the following:
  componentDidMount() {
    const { listEmployees } = this.props;
    listEmployees();
}-
This allows the following to happen:
- When the component is mounted (the user navigates to that tab), it will trigger the
listEmployeesactivity - That activity will make a Rest service call and eventually dispatch a LIST action with the resulting data
- The reducer will pick up the LIST action and update the Redux State with the new data
- The connected component will detect the state update and will re-run
mapStateToProps- this will take the data from Redux and pass it into our component as a prop
- When the component is mounted (the user navigates to that tab), it will trigger the
-
Now we update the data we are passing to the EmployeeTable in the render method. Note that we’re now pulling employees from props since React-Redux pulls them from global Redux state and adds them to the components props in
mapStateToProps -
We also pass down two of the actions we’re getting from
mapDispatchToPropsso that they can be called from a row
const { employees, deleteEmployee, restoreEmployee } = this.props;

return (
  <div>
    <h1>Employees</h1>
    <EmployeeTable employees={ employees } onDelete={deleteEmployee} onRestore={restoreEmployee} />
  </div>
);- Next let’s open src/employees/EmployeeTable.js and update the render method to pass the actions to the EmployeeRows
const { employees, onDelete, onRestore } = this.props;
...
{employees.map(employee => (
  <EmployeeRow employee={ employee } key={ employee._id } onDelete={onDelete} onRestore={onRestore} />
))}- Also, update the propTypes
EmployeeTable.propTypes = {
  employees: PropTypes.array.isRequired,
  onDelete: PropTypes.func,
  onRestore: PropTypes.func
};- Then we need to add a column header for the delete button we’ll add to the EmployeeRow
<th>Delete</th>-
Now let’s open src/employees/EmployeeRow.js and add the delete/restore functionality
-
Import the Bootstrap Button component
import { Button } from 'react-bootstrap';- Add a new table cell containing the button. The button can dynamically change its label & style based on whether a click would delete or restore the record. We also give it a click handler to call.
<td>
  <Button onClick={this.handleClick} bsStyle={employee.deleted ? 'success' : 'danger'}>
    {employee.deleted ? 'Restore' : 'Delete'}
  </Button>
</td>- Next, let’s make the row re-style based on whether the record has been deleted:
<tr className={employee.deleted ? 'deleted' : ''}>- Almost done! Implement the click handler method:
handleClick = (event) => {
  const { employee, onDelete, onRestore } = this.props;

  if (employee.deleted) {
    onRestore(employee);
  } else {
    onDelete(employee);
  }

  event.stopPropagation();
};- And lastly update our propTypes:
EmployeeRow.propTypes = {
  employee: PropTypes.object.isRequired,
  onDelete: PropTypes.func.isRequired,
  onRestore: PropTypes.func.isRequired
};
When finished, click here to view the final file:
import React from 'react';
import PropTypes from 'prop-types';
import { Button } from 'react-bootstrap';

class EmployeeRow extends React.Component {
  handleClick = (event) => {
    const { employee, onDelete, onRestore } = this.props;

    if (employee.deleted) {
      onRestore(employee);
    } else {
      onDelete(employee);
    }

    event.stopPropagation();
  };

  render() {
    const { employee } = this.props;

    return (
      <tr className={employee.deleted ? 'deleted' : ''}>
        <td>{employee.username}</td>
        <td>{employee.email}</td>
        <td>{employee.firstName}</td>
        <td>{employee.lastName}</td>
        <td>{employee.admin ? 'Yes' : 'No'}</td>
        <td>
          <Button onClick={this.handleClick} bsStyle={employee.deleted ? 'success' : 'danger'}>
            {employee.deleted ? 'Restore' : 'Delete'}
          </Button>
        </td>
      </tr>
    );
  }
}

EmployeeRow.propTypes = {
  employee: PropTypes.object.isRequired,
  onDelete: PropTypes.func.isRequired,
  onRestore: PropTypes.func.isRequired
};

export default EmployeeRow;
Run the application and see your work.
If you haven’t already done so,
- In a terminal windows run:
yarn startto fire off the build. - Navigate to http://localhost:3000 in your favorite browser.
Did your application display any data? Look at your console to see the reported “Proxy error”. This gives us a clue that we need to start our backend server to start supplying the data to our application.
Checkout the API repository
- Keep your
yarn startfrontend running, but now open a 2nd console window—or a separate tab - Change directories to a folder separate from the existing project. The parent directory above the react-redux-timesheet project would work nicely
- This is to get a backend server running and available for local development
Checkout the backend API server project from Github.
$ git clone https://github.com/objectpartners/react-redux-api.gitYou should get output similar to below:
Cloning into 'react-redux-api'...
remote: Counting objects: 6272, done.
remote: Compressing objects: 100% (2493/2493), done.
remote: Total 6272 (delta 3534), reused 6260 (delta 3523), pack-reused 0
Receiving objects: 100% (6272/6272), 2.31 MiB | 4.05 MiB/s, done.
Resolving deltas: 100% (3534/3534), done.
Checking connectivity... done.
Change directories into the API main directory.
$ cd react-redux-apiInstall the backend API NPM dependencies
$ yarnRun the backend API server
$ yarn startSee the results
- You may need to restart the frontend process in your frontend terminal console
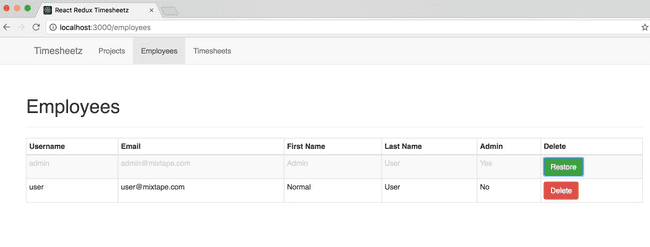
- Navigate to http://localhost:3000 in your favorite browser.
- Click around and enjoy the result of your hard work during this lab.

- How ‘bout that delete!
Commit your changes to Git and get ready for the next lab.
git add .
git commit -m "I think I know redux now?!"