Agenda
Workshop AgendaLab Three - Routing and Components
Switch to Lab03
- In a terminal:
cd ../ # presuming still in previous lab
cd lab-03
yarn start
Check it out!
- While we were working on the last lab, the rest of the team was adding lots of new stuff to the app
-
Before proceeding, let’s look at the progress that has been made:
- Peruse the src directory and notice that the Timesheets module has been implemented by the team.
- You will be building out the Employees module and adding Navigation to the app.
- The module files have been stubbed out for you, we just need to add the logic.
Creating our Application’s Routes
- Open src/App.js
- Let’s start by importing the component classes that we’re going to use as the Handlers for our routes:
import Projects from './projects/Projects';
import Employees from './employees/Employees';
import Timesheets from './timesheets/Timesheets';- Next we’ll import some classes from
react-router-dom- this library is a way to declarereact-routerrules within JSX
import { BrowserRouter, Route, Switch, Redirect } from 'react-router-dom';-
Next let’s configure our routes:
- We need to wrap the routes in a BrowserRouter so the Browser URL is used to determine which Routes match
- We only want to render a single segment of the app based on the URL, so we add a Switch
- We need separate sibling routes for Projects, Employees, and Timesheets.
- If no route matches, we want to redirect the user to the Employees component.
  render() {
    return (
      <BrowserRouter>
        <div className="App">
          <div className="container">
            <Switch>
              <Route path="/projects" component={Projects}/>
              <Route path="/employees" component={Employees}/>
              <Route path="/timesheets" component={Timesheets}/>
              <Redirect to="/employees"/>
            </Switch>
          </div>
        </div>
      </BrowserRouter>
    );
}-
Finally, let’s add the Navigation component while we’re here.
- Let’s import the Navigation component - then add the component just inside the “App” div (but outside the “container” div)
import Navigation from './nav/Navigation';<Navigation />Click here to see the finished class:
import React from 'react';
import './App.css';
import Projects from './projects/Projects';
import Employees from './employees/Employees';
import Timesheets from './timesheets/Timesheets';
import Navigation from './nav/Navigation';
import { BrowserRouter, Route, Switch, Redirect } from 'react-router-dom';

class App extends React.Component {
  render() {
    return (
      <BrowserRouter>
        <div className="App">
          <Navigation />
          <Switch>
            <Route path="/projects" component={Projects} />
            <Route path="/employees" component={Employees} />
            <Route path="/timesheets" component={Timesheets} />
            <Redirect to="/employees" />
          </Switch>
        </div>
      </BrowserRouter>
    );
  }
}

export default App;
Implement the Navigation bar
-
Open src/nav/Navigation.js
-
We first need to import the Bootstrap components that we are going to use
-
There is also a NavLink component from the react-router-dom library that helps us integrate the router
import React from 'react';
import { Nav, Navbar, NavItem } from 'react-bootstrap';
import { NavLink } from 'react-router-dom';- Now we can implement our
render()method:
  render() {
    return (
      <Navbar>
        <Navbar.Header>
          <Navbar.Brand>
            Timesheetz
          </Navbar.Brand>
        </Navbar.Header>
        <Nav>
          <NavItem><NavLink to="/projects">Projects</NavLink></NavItem>
          <NavItem><NavLink to="/employees">Employees</NavLink></NavItem>
          <NavItem><NavLink to="/timesheets">Timesheets</NavLink></NavItem>
        </Nav>
      </Navbar>
    );
}-
What did we just do?
- We’ve told Bootstrap to render our application name as a header
- We declared a Nav component with three navigation items in it
- Each navigation item is a NavLink which, when clicked, will tell react-router to switch the current URL to a new value
Test the Navbar
-
Just like in lab 2, we need to test that our component will render without errors.
-
Open src/nav/Navigation.test.js and add the test suite.
-
Add the below code to the Navigation.test.js
import React from 'react';
import { shallow } from 'enzyme';
import Navigation from './Navigation';

describe('<Navigation />', () => {
  let wrapper;

  beforeEach(() => {
    wrapper = shallow(
      <Navigation />
    );
  });

  it('should instantiate the Navigation Component', () => {
    expect(wrapper).toHaveLength(1);
  });
});
Run the tests
-
Run
yarn testand verify that the Navigation tests pass.- Since the rest of your team has already implemented a bunch of tests, you may have to do a little searching to find the tests you just wrote.
- Also, the stubbed tests for the employee components will fail since we haven’t implemented them yet
Run the application and see your work.
If you haven’t already done so,
- In a terminal window run:
yarn startto fire off the build. - Navigate to http://localhost:3000 in your favorite browser.
-
You should be able to click around the navbar and see the routes change.
- It should work fine for Timesheets and Projects, but we still need to implement Employees.
Composing React Components
-
Now that we have functional routing between our three sections of the application, we need to finish the Employee module.
-
This is going to be very much like the Projects components you created in the previous lab, so as a challenge we aren’t going to give you quite as many hints. Try to implement them by referencing what you did previously. If you get stuck the code is still available at the end.
-
We want to display the list of employees when the user clicks the employee link in the navbar.
-
To do this, we need to build three components:
- The Employees route handler that acts as our container component.
- The EmployeeTable component to contain our list of employees.
- The EmployeeRow component that is repeated within our EmployeeTable component for each employee.
Create the EmployeeRow Component
- Open src/employees/EmployeeRow.js
- We need to create a component that accepts an employee property (which is an object).
- The row should contain
<td/>’s for each of the employee’s properties (username, email, firstName, lastName, and Yes/No for whether they’re an admin)
When finished, click here to see if your component is similar to the one below:
  import React from 'react';
  import PropTypes from 'prop-types';

  class EmployeeRow extends React.Component {
    render() {
      const { employee } = this.props;

      return (
        <tr>
          <td>{employee.username}</td>
          <td>{employee.email}</td>
          <td>{employee.firstName}</td>
          <td>{employee.lastName}</td>
          <td>{employee.admin ? 'Yes' : 'No'}</td>
        </tr>
      );
    }
  }

  EmployeeRow.propTypes = {
    employee: PropTypes.object.isRequired
  };

  export default EmployeeRow;
- Now, we need to test that our component renders correctly.
- Verify the row renders without blowing up and that each cell is showing the correct value
When finished, click here to see if your suite is similar to the one below:
import React from 'react';
import EmployeeRow from './EmployeeRow';
import { shallow } from 'enzyme';

describe('<EmployeeRow />', () => {
  let wrapper;

  beforeEach(() => {
    const employee = {
      username: 'fflintstone',
      email: 'fred.flintstone@slatequarry.com',
      firstName: 'Fred',
      lastName: 'Flintstone',
      admin: true
    };

    wrapper = shallow(<EmployeeRow employee={employee} />);
  });

  it('should render values into expected cells', () => {
    expect(wrapper.find('td')).toHaveLength(5);
    expect(wrapper.find('td').at(0).text()).toEqual('fflintstone');
    expect(wrapper.find('td').at(1).text()).toEqual('fred.flintstone@slatequarry.com');
    expect(wrapper.find('td').at(2).text()).toEqual('Fred');
    expect(wrapper.find('td').at(3).text()).toEqual('Flintstone');
    expect(wrapper.find('td').at(4).text()).toEqual('Yes');
  });
});
- Run the tests. Did your new one pass?
Create the EmployeeTable Component
- Our next move is to create the table that will contain our EmployeeRows.
- Build a render method that iterates over a list of employees and builds an EmployeeRow for each
- Don’t forget to add appropriate propTypes
When finished, click here to see if your component is similar to the one below:
import React from 'react';
import PropTypes from 'prop-types';
import { Table } from 'react-bootstrap';
import EmployeeRow from './EmployeeRow';

class EmployeeTable extends React.Component {
  render() {
    const { employees } = this.props;

    return (
      <Table bordered striped>
        <thead>
          <tr>
            <th>Username</th>
            <th>Email</th>
            <th>First Name</th>
            <th>Last Name</th>
            <th>Admin</th>
          </tr>
        </thead>
        <tbody>
          {employees.map(employee => (
            <EmployeeRow employee={ employee } key={ employee._id }/>
          ))}
        </tbody>
      </Table>
    );
  }
}

EmployeeTable.defaultProps = {
  employees: []
};

EmployeeTable.propTypes = {
  employees: PropTypes.array.isRequired
};

export default EmployeeTable;
- Now let’s test that our employee table renders correctly.
- Can you write a test to check the number of EmployeeRows added to our table?
When finished, click here to see if your suite is similar to the one below:
import React from 'react';
import EmployeeTable from './EmployeeTable';
import { shallow } from 'enzyme';
import EmployeeRow from './EmployeeRow';

describe('<EmployeeTable />', () => {
  let wrapper;

  beforeEach(() => {
    const employees = [
      {
        username: 'fflintstone',
        email: 'fred.flintstone@slatequarry.com',
        firstName: 'Fred',
        lastName: 'Flintstone',
        admin: true,
        _id: 1
      }
    ];

    wrapper = shallow(<EmployeeTable employees={employees} />);
  });

  it('should render a row for each employee', () => {
    expect(wrapper.find(EmployeeRow)).toHaveLength(1);
  });
});
- Run the tests. Did your new one pass?
Create Employees Component
- Last, we need to add the table to our handler for the
/employeesroute. - Open src/employees/Employees.js and implement the data container
- To get your started, here’s some mock data:
[{
  _id: 1,
  username: 'admin',
  email: 'admin@mixtape.com',
  password: 'password',
  admin: true,
  firstName: 'Admin',
  lastName: 'User'
}, {
  _id: 2,
  username: 'user',
  email: 'user@mixtape.com',
  password: 'password',
  admin: false,
  firstName: 'Normal',
  lastName: 'User'
}]
When finished, click here to see if your component is similar to the one below:
  import React from 'react';
  import PropTypes from 'prop-types';
  import EmployeeTable from './EmployeeTable';

  class Employees extends React.Component {
    state = {
      employees: [
        {
          _id: 1,
          username: 'admin',
          email: 'admin@mixtape.com',
          password: 'password',
          admin: true,
          firstName: 'Admin',
          lastName: 'User'
        },
        {
          _id: 2,
          username: 'user',
          email: 'user@mixtape.com',
          password: 'password',
          admin: false,
          firstName: 'Normal',
          lastName: 'User'
        }
      ]
    };

    render() {
      const { employees } = this.state;

      return (
        <div>
          <h1>Employees</h1>
          <EmployeeTable employees={ employees }/>
        </div>
      );
    }
  }

  Employees.propTypes = {
      employees: PropTypes.arrayOf(PropTypes.object)
  };

  export default Employees;
- Open src/employees/Employees.test.js
- Test that our component renders as expected and passes down the expected data to EmployeeTable
When finished, click here to see if your component is similar to the one below:
import React from 'react';
import Employees from './Employees';
import { shallow } from 'enzyme';
import EmployeeTable from './EmployeeTable';

describe('<Employees />', () => {
  let wrapper;

  beforeEach(() => {
    wrapper = shallow(<Employees />);
  });

  it('should instantiate the Employee Component', () => {
    expect(wrapper).toHaveLength(1);
  });

  it('should pass employees down to table', () => {
    wrapper.setState({
      employees: [{}, {}, {}, {}]
    });
    expect(wrapper.find(EmployeeTable).prop('employees')).toHaveLength(4);
  });
});
- Run the tests.
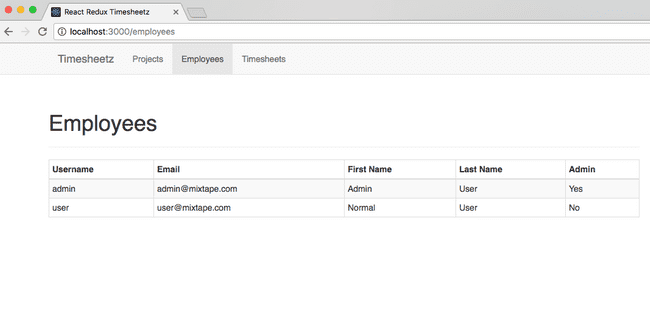
Run the application and see your work.
If you haven’t already done so,
-
In a terminal windows run:
yarn startto fire off the build. -
Navigate to http://localhost:3000 in your favorite browser.
-
Click around and enjoy the result of your hard work during this lab.
Commit your changes to Git and get ready for the next lab.
git add .
git commit -m "We added some routes"